Copilot for Microsoft 365 Series - 4 - Dall-E 3 sample plugin

Introduction#
A while ago I created my first plugin for Copilot for Microsoft 365. Therefore, I would like to take the opportunity to share my experience and insights. You can find the working plugin sample in my GitHub repository .
The setup#
I used the Teams Toolkit for Visual Studio Code to develop my plugin. You also need to make sure that you fulfill all the requirements mentioned here . Additionally, you need to deploy an Azure Open AI resource in your Azure subscription. Make sure sure to choose an Azure region which offers Dall-E models from the list of available regions , otherwise you cannot deploy a Dall-E model.
Developing the plugin#
When cloning my repo, make sure that you create a file called .localConfigs in the root of your plugin’s folder and add the following content to that file along with the correct values for those parameters:
BOT_ID=
BOT_PASSWORD=
SECRET_AOAI_KEY=
AOAI_ENDPOINT=
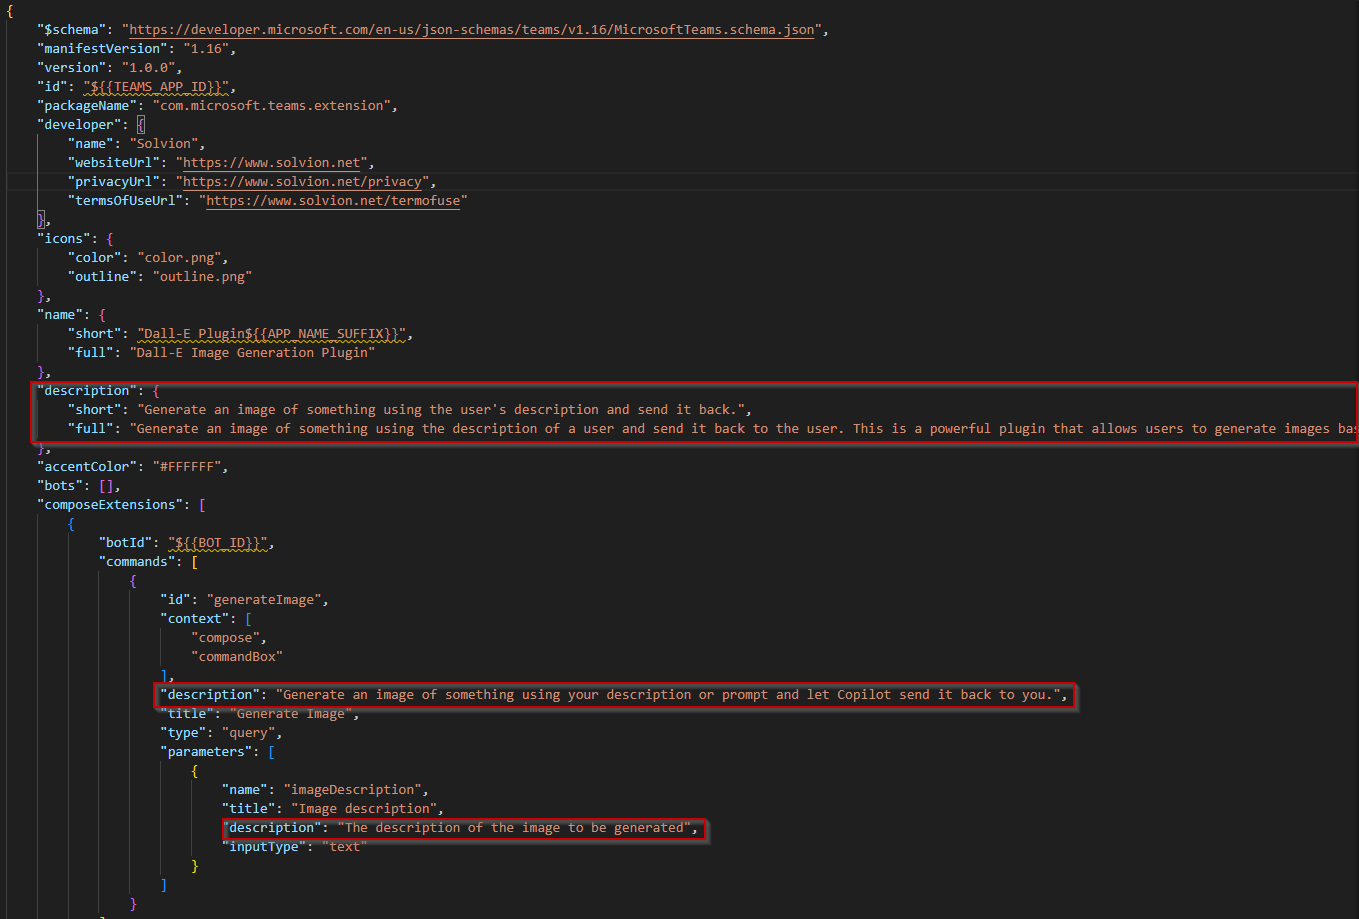
The next important part is your manifest. The manifest is crucial as Copilot uses it to determine what your plugin will do and how it can be used as well as when it should be triggered. Therefore, make sure to add meaningful descriptions to your app, your commands, and your parameters:
Then within the searchApp.ts you will need to call your Azure Open AI resource API to generate an image and retreive it:
public async handleTeamsMessagingExtensionQuery(
  context: TurnContext,
  query: MessagingExtensionQuery
): Promise<MessagingExtensionResponse> {
  const searchQuery = query.parameters[0].value;
  const attachments = [];
  //const apiKey = ""; // Insert your Azure Open AI API Key here
  const service = new DalleService(apiKey, endpoint, searchQuery);
  switch (query.commandId ) {
    case 'generateImage':
      console.log('Trying to generate image using Dall-E');
      let response = await service.makeApiCall();
      const template = new ACData.Template(imageCard);
      const card = template.expand({
        $root: {
          prompt: response.data[0].revised_prompt,
          imageUrl: response.data[0].url,
        },
      });
      const preview = CardFactory.heroCard(response.data[0].revised_prompt);
      console.log('Revised Prompt: ', response.data[0].revised_prompt);
      console.log('Image URL: ', response.data[0].url);
      const attachment = { ...CardFactory.adaptiveCard(card), preview };
      attachments.push(attachment);
      return {
        composeExtension: {
          type: "result",
          attachmentLayout: "list",
          attachments: attachments,
        },
    };
  break;
}

return {
  composeExtension: {
    type: "result",
    attachmentLayout: "list",
    attachments: attachments,
  },
  };
}
To send the image back to the user, simply use an Adaptive Card, which is used to render the image:
{
  "$schema": "http://adaptivecards.io/schemas/adaptive-card.json",
  "type": "AdaptiveCard",
  "version": "1.5",
  "body": [
      {
          "type": "TextBlock",
          "text": "${prompt}",
          "wrap": true,
          "size": "Large"
      },
      {
          "type": "Image",
          "url": "${imageUrl}",
          "size": "Large"
      },
      {
          "type": "ActionSet",
          "actions": [
              {
                  "type": "Action.OpenUrl",
                  "title": "Open Image",
                  "url": "${imageUrl}"
              }
          ]
      }
  ],
  "previewCard": {
      "contentType": "application/vnd.microsoft.card.hero",
      "content": {
          "title": "${prompt}",
          "text": "${prompt}"
      }
  }
}
And tha’s it, you’ve built your first plugin. In VS Code you can now hit F5 and test it right within Copilot in Teams!
Conclusion#
Plugins play a crucial role in enhancing the Copilot ecosystem. They enable the expansion of Copilot’s inherent abilities and facilitate integration with your line-of-business applications or external platforms. Therefore, it’s important to tailor Copilot with plugins that suit your specific requirements and scenarios. However, it’s equally important to provide detailed and accurate descriptions for these plugins to ensure Copilot recognizes and utilizes them effectively.