Bot Framework Composer Series - 5 - Proactive Messages

Introduction
In this post I will show you how to extend Bot Framework Composer to support proactive messages. I will also show you how to use the extension to send proactive messages from a web application. The goal here is to use the feature of proactive messages to send notifications to users in Microsoft Teams from a web application or API.
The implementation
What we need is basically any chatbot build with Bot Framework Composer. So you can either go ahead and create a new one (it doesn’t matter which template you choose) or you can use a bot which you already built using Composer. I will use the bot I created in the previous post in this series. You can find the code for the bot here .
There are basically 3 things we need to do to extend Composer to support proactive messages:
- We need to add an additional controller to the bot called NotifyController which will be used to manage and send the proactive messages
- We need at least one Adaptive Card to be used within the proactive message towards the user
NotifyController
The NotifyController is the controller which will be used to send the proactive messages. It will be called from a web application or API to send the message. The controller will be added to the bot project and will be called from the web application or API. The controller will be called with a JSON payload which will contain the following information:
{
    "botId": "28:botid",
    "userId": "29:userid",
    "conversationId": "19:conversationid",
    "cardName": "oppCard.json"
}
The controller will then use the information from the JSON payload to send the message to the user. Therefore the controller to be added into the Controllers folder of the bot project will look like this:
using System.Threading.Tasks;
using Microsoft.AspNetCore.Mvc;
using Microsoft.Bot.Builder;
using Microsoft.Bot.Builder.Integration.AspNet.Core;
using Microsoft.Bot.Schema;
using Microsoft.Extensions.Configuration;
using System;
using System.Collections.Concurrent;
using System.Collections.Generic;
using System.IO;
using System.Linq;
using System.Net;
using System.Text;
using System.Threading;
using System.Web;
using Microsoft.Bot.Builder.Teams;
using Microsoft.Bot.Connector;
using Microsoft.Bot.Connector.Authentication;
using Microsoft.Bot.Schema.Teams;
using Microsoft.Extensions.Logging;
using Newtonsoft.Json;
using Newtonsoft.Json.Linq;

namespace ErdwinDemo.Controllers
{
    [Route("api/notify")]
    [ApiController]
    public class NotifyController : ControllerBase
    {
        private readonly IBotFrameworkHttpAdapter _adapter;
        private readonly IBot _bot;
        private string _appId;
        private string _appSecret;
        private string _serviceUrl;
        private string _conversationId;
        public NotifyController(IBotFrameworkHttpAdapter adapter, IBot bot, IConfiguration configuration)
        {
            _adapter = adapter;
            _bot = bot;
            _appId = configuration["MicrosoftAppId"]; // The Microsoft App Id of your Bot
            _appSecret = configuration["MicrosoftAppPassword"]; // The Microsoft App Password of your Bot
            _serviceUrl = "https://smba.trafficmanager.net/emea/";
        }

        [HttpPost]
        public async Task<IActionResult> Post([FromBody] string content)
        {
            MicrosoftAppCredentials.TrustServiceUrl(_serviceUrl);
            var connectorClient = new ConnectorClient(new Uri(_serviceUrl), new MicrosoftAppCredentials(_appId, _appSecret));
            dynamic json = JsonConvert.DeserializeObject(content);
            var bot = json["botId"].Value;
            var user = json["userId"].Value;
            _conversationId = json["conversationId"].Value;
            var cardName = json["cardName"].Value;
            await SendCardAsync(connectorClient, _conversationId, user, bot, cardName);
            return new ContentResult()
            {
                Content = "Notification received and send out: " + content.ToString(),
                ContentType = "text/html",
                StatusCode = (int)HttpStatusCode.OK,
            };
        }

        private static Attachment CreateAdaptiveCardAttachment(string cardName){
            var cardResourcePath = Path.Combine(".", "Resources", cardName);
            var adaptiveCardJson = System.IO.File.ReadAllText(cardResourcePath, Encoding.UTF8);
            var adaptiveCardAttachment = new Attachment()
            {
                ContentType = "application/vnd.microsoft.card.adaptive",
                Content = JsonConvert.DeserializeObject(adaptiveCardJson),
            };
            return adaptiveCardAttachment;
        }

        private static async Task SendCardAsync(ConnectorClient connectorClient, string conversationId, string recipientId, string fromId, string cardName)
        {
            Activity messageActivity = new Activity();
            messageActivity.Type = ActivityTypes.Message;
            var attachments = new List<Attachment>();
            Activity reply = new Activity();
            messageActivity.Attachments = attachments;
            messageActivity.Attachments.Add(CreateAdaptiveCardAttachment(cardName));
            messageActivity.ChannelId = Channels.Msteams;
            messageActivity.ServiceUrl = "https://smba.trafficmanager.net/emea/";
            messageActivity.Conversation = new ConversationAccount()
            {
                Id = conversationId
            };
            messageActivity.Recipient = new ChannelAccount()
            {
                Id = recipientId
            };
            messageActivity.From = new ChannelAccount()
            {
                Id = fromId
            };
            await connectorClient.Conversations.SendToConversationAsync(messageActivity);
        }
    }
}
Adaptive Cards
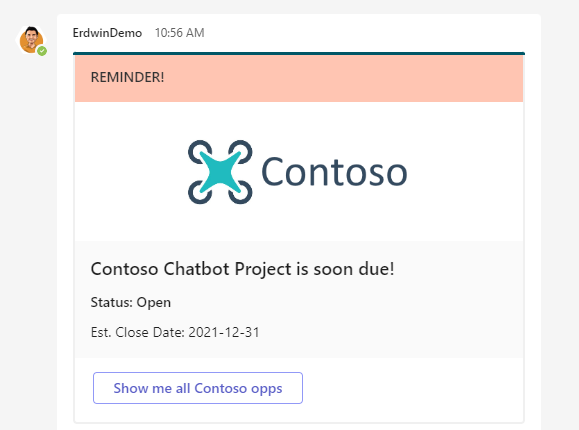
As you can see in the json payload we are handing over a property called cardName, so we need to make sure to add this card to the bot project. The card will be added to the Resources folder of the bot project. The card will be called oppCard.json and will look like this:
{
    "type": "AdaptiveCard",
    "$schema": "http://adaptivecards.io/schemas/adaptive-card.json",
    "version": "1.5",
    "body": [
        {
            "type": "Container",
            "style": "attention",
            "bleed": true,
            "items": [
                {
                    "type": "TextBlock",
                    "text": "REMINDER!",
                    "wrap": true,
                    "style": "heading",
                    "weight": "Bolder"
                }
            ]
        },
        {
            "type": "Container",
            "bleed": true,
            "spacing": "None",
            "items": [
                {
                    "type": "Image",
                    "url": "https://someImage.png",
                    "spacing": "None",
                    "horizontalAlignment": "Center"
                },
                {
                    "type": "Container",
                    "items": [
                        {
                            "type": "TextBlock",
                            "text": "Contoso Chatbot Project is soon due!",
                            "wrap": true,
                            "size": "Large",
                            "weight": "Bolder"
                        },
                        {
                            "text": "Status: Open",
                            "type": "TextBlock",
                            "weight": "Bolder"
                        },
                        {
                            "text": "Est. Close Date: 2021-12-31",
                            "type": "TextBlock"
                        }
                    ],
                    "style": "emphasis",
                    "spacing": "None",
                    "bleed": true
                }
            ]
        }
    ],
    "actions": [
        {
            "type": "Action.Submit",
            "title": "Show me all Contoso opps",
            "data": {
                "msteams": {
                    "type": "messageBack",
                    "displayText": "Show me all Contoso opps",
                    "text": "Show me all Contoso opps"
                }
            }
        }
    ]
}
If everything is in place you can use Postman or Curl to send the notification to the bot. The notification will look like this (remember to insert the correct values for botId, userId and conversationId):
{
    "botId": "28:botid",
    "userId": "29:userid",
    "conversationId": "19:conversationid",
    "cardName": "oppCard.json"
}
If everything is ok, then your bot should send out a new proactive message to the user which you set in the userId property. The message should look like this:

Conclusion
In this blog post we have seen how to create a proactive bot in Microsoft Teams. We have also seen how to create an Adaptive Card and how to send it out to the user. If you have any questions or comments, please let me know in the comments below.