Boost your Modern Workplace with Microsoft's AI ecosystem - Part 1 - SharePoint Online Intranet Bot
The terms “Modern Workplace” or “Digital Workplace” is something every one of us have heard about in the last couple of months probably. It is some trend which should improve the workplace situation in order to digitally transform the way we work and make it more easier to communicate and collaborate with others. Therefore, the use of smart services can be beneficial when it comes to really transforming your workplace into a modern one. As Microsoft offers a variety of services & solutions in the AI world, these services can fit perfectly fine into that new world which helps your users adopt the new workplace easier. Therefore, this blog post is the first in series with much more to come which is dealing with the question how to actually integrate those AI services in the Microsoft AI ecosystem into your modern workplace to make it smarter and help your users in terms of adoption. In this first article, we will have a look at one major topic when talking about the modern workplace which is the “Intranet” and how to integrate some kind of digital assistant in the form of a bot into your SharePoint (Online) based intranet.
Prerequisites#
- In order to implement the scenario into a SharePoint Online environment we need the following things:
- Office 365 Tenant (with global admin or at least SharePoint Online service admin permissions)
- Azure Subscription
- Development environment set up according to Set up your SharePoint Framework development environment
Bot Design#
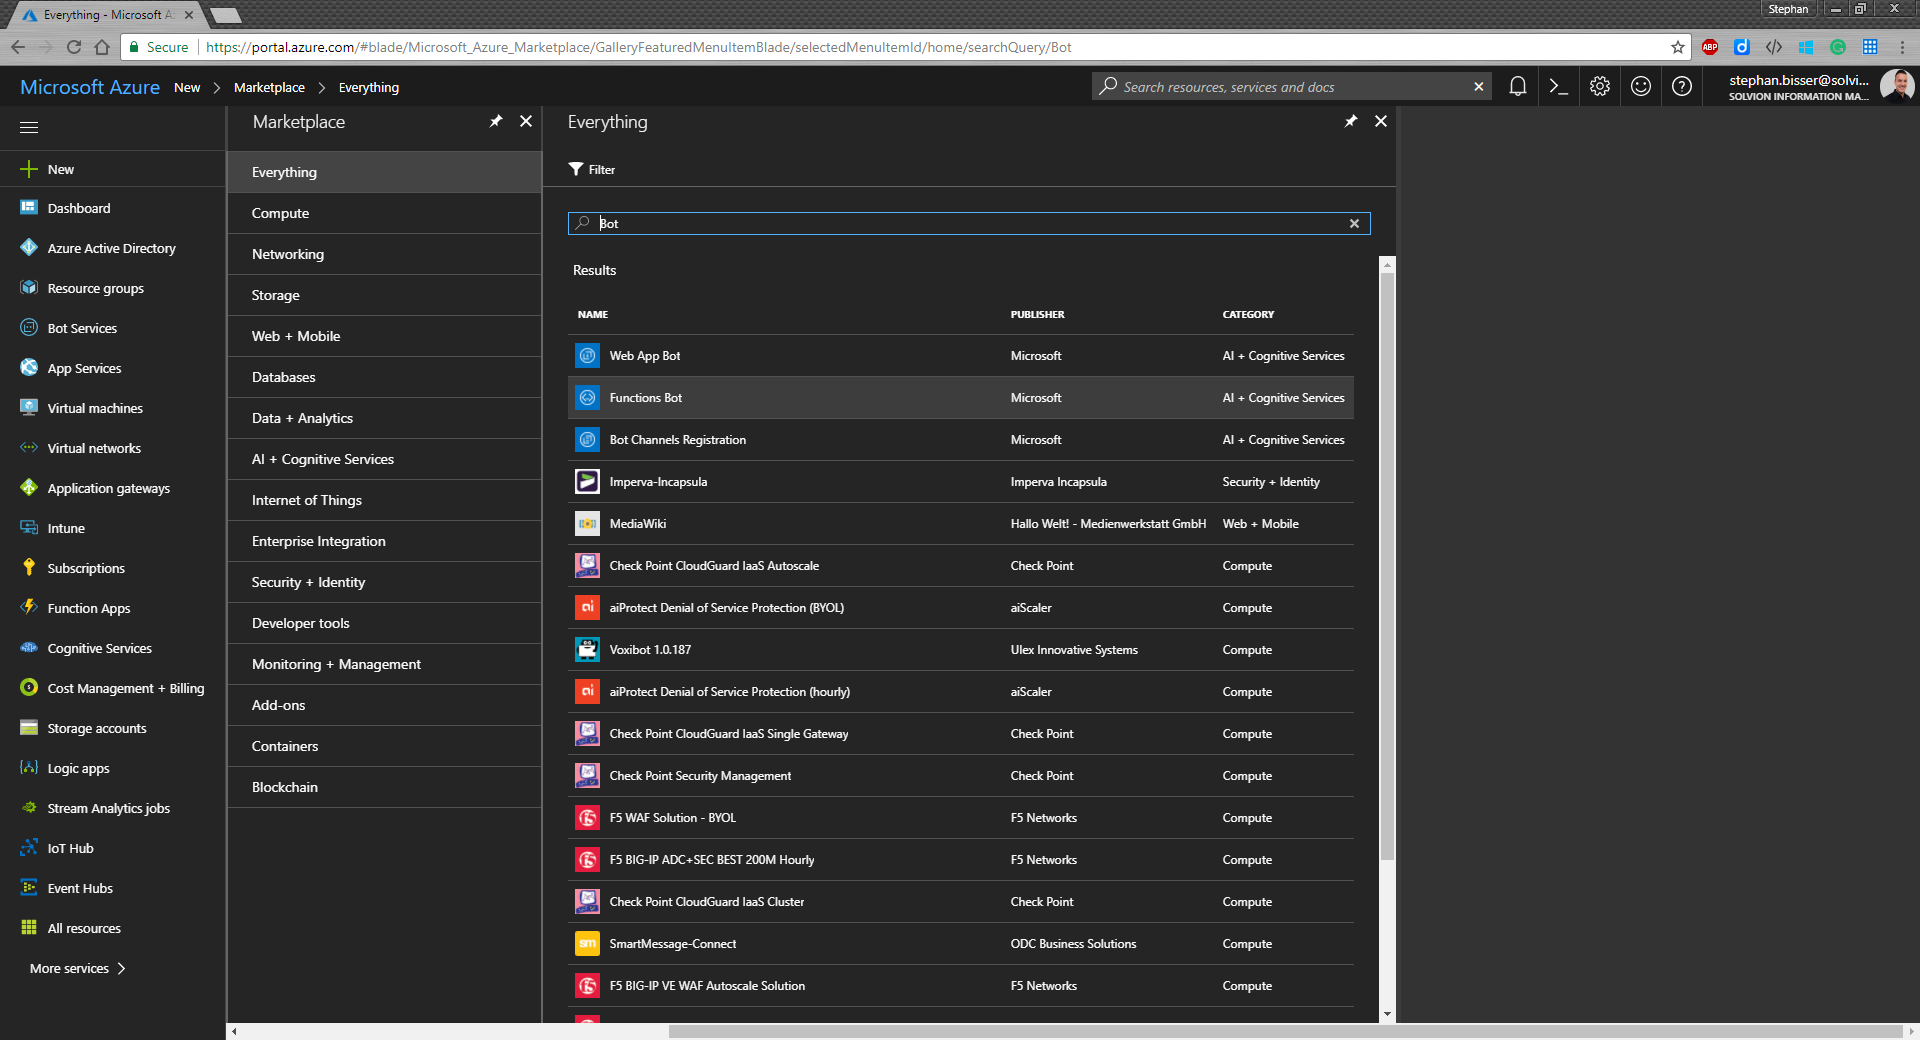
As the Bot is our key component in this scenario we want to start building it. Therefore we have to go to the Azure Portal click “+ New” - Search for “Bot” and select “Functions Bot” as this is the serverless approach of building and deploying bots.
After clicking “Create” we have to fill out some basic properties in order to give the bot a name, select the right subscription, region and template. My bot has the following specs, but please feel free to choose whatever you want (Attention: Stick with the “Consumption Plan” for the Hosting Plan as this defines that you actually pay what you use - so if you don’t use anything as you might have turned off your bot you won’t be charged. Please read Azure Functions scale and hosting for more details on the hosting plans).

As you can see I have gone for the NodeJS Question and Answer template as I feel comfortable in building NodeJS apps. But you can, of course, go for the C# template as well if you like. The reason why I chose the QnA template is simple - it comes with a predefined code base which has everything defined for connecting to the QnA Maker API (qnamaker.ai) which can be used to easily build a set of question and answer pairs as this is most probably a good starting point for an intranet bot. After your bot has been created we can navigate to the resource in the Azure Portal in order to start building it.
But first of all, we need to define our QnA knowledge base. So we need to navigate to QnAMaker where we want to create a new service and fill out a basic form:

As you can see I have left the URL(S) blank as I don’t have a website hosting some kind of FAQ pages at the moment. You can, of course, add your URL(S) in here if you have some sort of knowledge base already or you can select “STARTING FROM SCRATCH” where you have the chance to enter your question and answer pairs manually on the next page. But you can also use my sample file which you can download here in order to have at least some basic questions and answers which might be asked by your users (please feel free to adapt it according to your needs). After filling out the form and clicking create you will be presented with your QnA pairs. You now have the chance to modify them or to add new ones, but basically, we are ready to train & publish our service. So the first thing is to click on “Save and retrain” if you made any modifications (if you didn’t you can skip this) followed by publishing it. After you have published it you will be presented with a sample HTTP request which can be used in order to build your bot. But what we actually need now are the 2 values of the sample:
- QnAKnowledgebaseId
- QnASubscriptionKey
The QnAKnowledgebaseId can be found in the first line after POST /knowledgebases/ and the QnASubscriptionKey is the value provided after Ocp-Apim-Subscription-Key. Please copy both values somewhere as we need them in the next step.
Now we need to go back to the Bot’s page in the Azure Portal and navigate to the “Application Settings” pane where we need to insert the values we copied before:
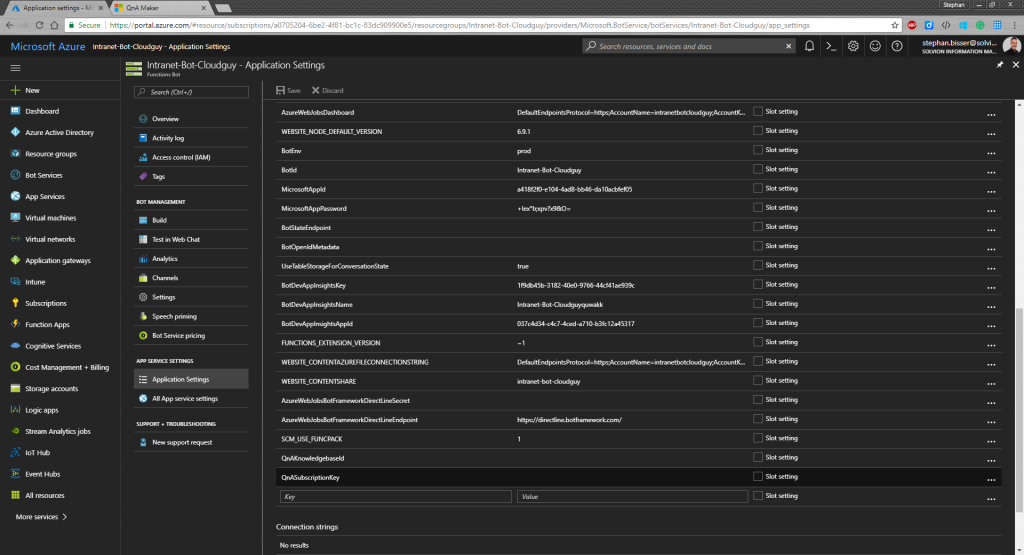
After inserting the values and saving we are now ready to build our bot. But wait - we do not need to build our bot now because the bot is already ready for use. Go ahead and test the bot directly in the Azure Portal:
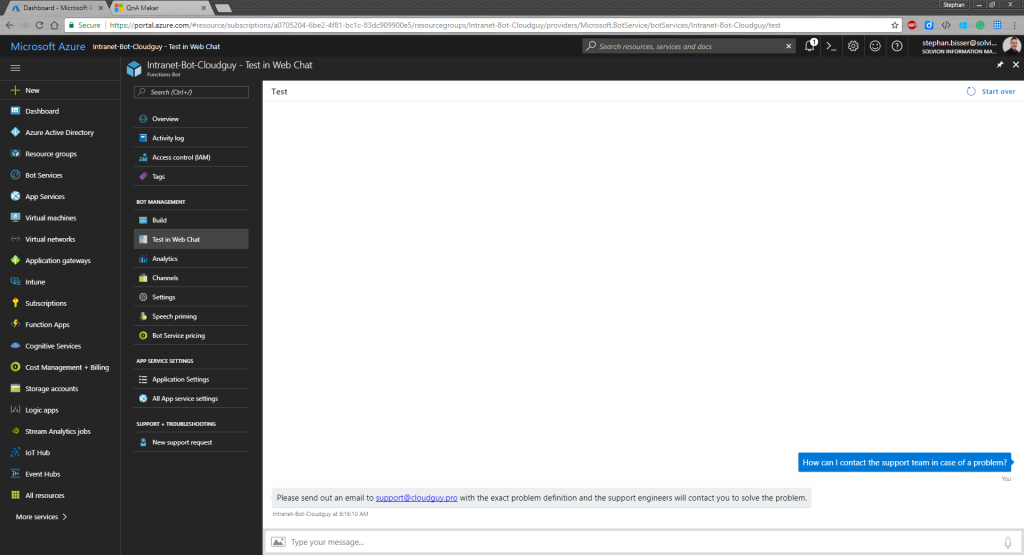
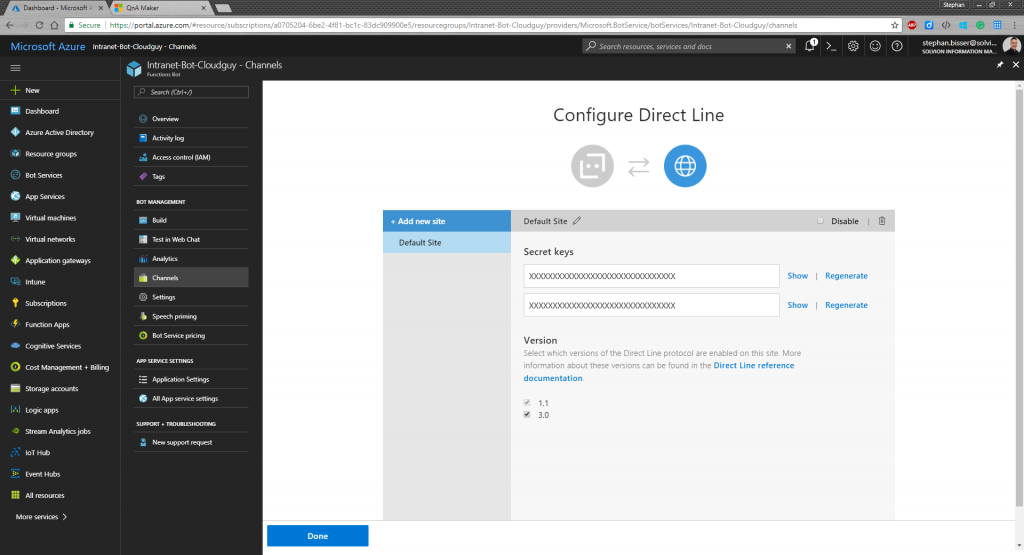
The cool thing is that the QnA Maker is so smart that it even renders email addresses correctly to make them actually usable without any modification. So now we have our bot ready for deployment into our SharePoint Online based intranet. As we will use Direct Line for the communication between our SharePoint Online page and the bot we need to enable the Direct Line channel on the Bot’s channel settings page and make sure to copy the secret key and store it somewhere as we will need that later on:
SharePoint Online Setup#
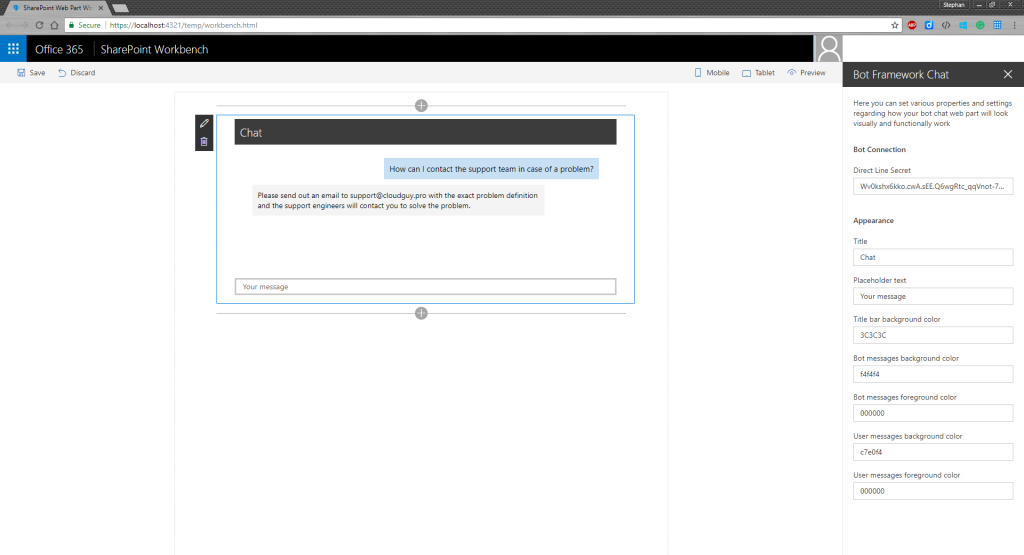
I have set up a SPO communication site as this might reflect the basic ideas of a modern intranet build with SharePoint Online. So now we have to get our Bot deployed to our SPO communication site. Therefore we will make use of one of the SPFX sample web parts build by Joel Rodrigues and Vesa Juvonen (Thanks for that - Great work!!) as this can be used right away. So go ahead and download the sample from GitHub onto your development machine and follow the minimal path to awesome on this page to successfully use it. So after running gulp serve in your command line you should be presented with the local SharePoint workbench where you can start adding the web part to the page (Please make sure you have added your Direct Line Secret in the web part’s config to make it actually communicate with the Bot):
Now we are actually ready to deploy the web part to our SPO environment. For the sake of simplicity I won’t show you how to make it enterprise ready and deploy our web part’s packages and dependencies to a CDN to fully host it in the cloud, but if you are interested in doing so, then please take a look at Host your client-side web part from Office 365 CDN and follow these steps mentioned there.
Going back to the command line window, we can now safely stop the gulp serve task (CTRL+C) and execute the following command gulp package-solution in order to package the solution. This will create a folder called "sharepoint" in your solution as well as a .sppkg file. Now go ahead to your SPO app catalog and upload your package there (as described here: Deploy your client-side web part to a SharePoint page ):
Now go back to your communication site and select add an app from the gear in the right upper corner. Now search for the web part we uploaded and click on it in order to add it to the page. Upon completion, we can now add the web part to our site finally. Now edit the page add your web part to the page where you want the bot to be placed, fill in the Direct Line Secret in the web part’s config section and make sure you run the gulp serve task from your command line. If you have done everything you should be able to chat with the bot right inside you SharePoint Online communication site.
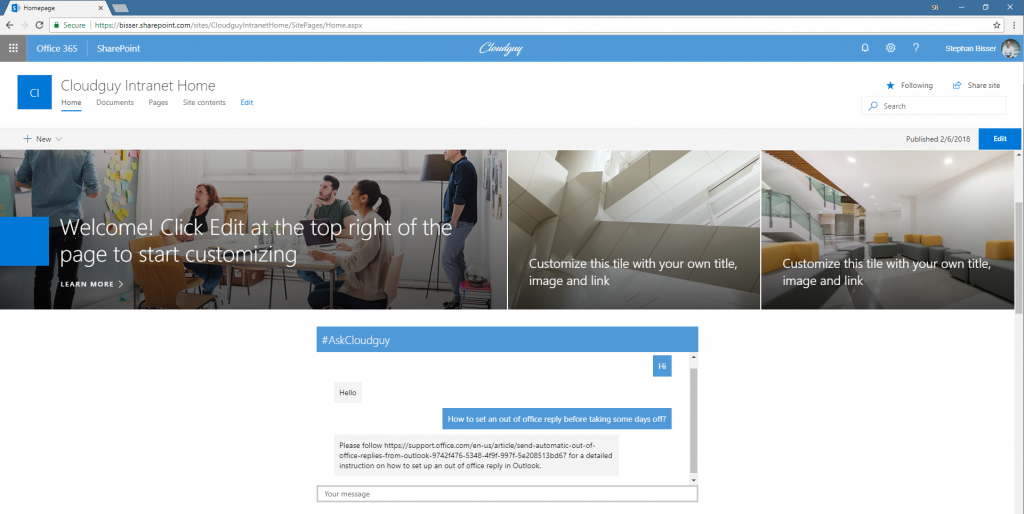
Congratulations you now have your very own digital assistant deployed to your intranet without much development effort (Of course you could now adapt the styling and brand the web part to fit your CI/CD - but that’s something you may be better in than me).
Conclusion#
The Azure Bot Service offers great ways for building, hosting and deploying bots without the need to have a development background
QnAMaker is one great way of adding some intelligence to a digital assistant in form of a bot
Bots make intranets look and behave more modern and will help your users to adopt the new technologies of your modern workplace portfolio quicker
Kudos#
Thanks to Vesa Juvonen , the whole Office Dev PnP team and the SPFX team for pushing so many great features.
Another shout out goes to Thomas Gölles for helping me out with the development skills (I don’t have) ;) as well as the whole Bot Framework team for enabling us non-devs building great bots without much development effort…